Meta description: I migrated a self-hosted MongoDB cluster to Atlas with zero downtime using Live Migration. Here’s the exact process, real errors, and commands I used in production.
Last updated: June 2025
Introduction
Eighteen months ago, I got paged at 2 AM because our self-hosted MongoDB replica set had filled its disk. We patched it, bought ourselves a week, and I started planning the migration to Atlas that I’d been putting off for months. The prospect of a maintenance window scared me — our platform processed orders 24/7 and even 10 minutes of database downtime would cost real money and real customers.
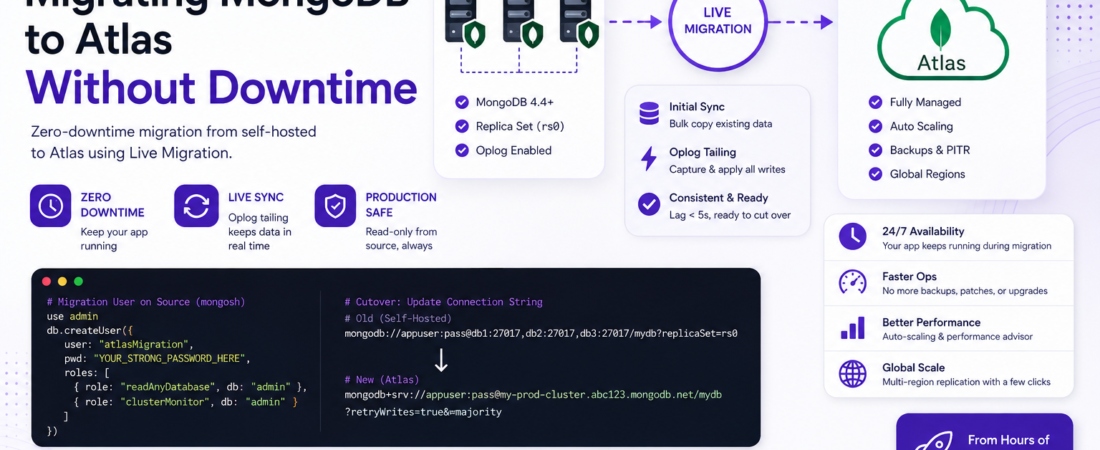
What I discovered is that migrating MongoDB self-hosted to Atlas doesn’t have to mean downtime. Atlas has a Live Migration feature that moves your data in the background, keeps it in sync in real time, and gives you a clean cutover window that’s typically under a minute of application restart time. I’ve now run this process twice across two different production environments, and I want to share exactly how I did it — including the mistakes I made the first time.
TL;DR
- Use MongoDB Atlas Live Migration for zero-downtime moves — it syncs your replica set to Atlas continuously while your app keeps running.
- The actual cutover is just pointing your app’s connection string to Atlas; downtime is app restart time only (typically under 60 seconds).
- Watch out for index build time, oplog window, and VPC peering latency — these are the three things that can sink a migration if you don’t plan for them.
Why Migrate from Self-Hosted MongoDB to Atlas?
Self-hosting MongoDB gives you full control, but the operational burden is real: storage management, backup scheduling, replica set health monitoring, version upgrades, and security patching all fall on your team.
MongoDB Atlas is the fully managed database-as-a-service from MongoDB, Inc. It handles all of the above plus adds built-in performance advisor, auto-scaling, and multi-region replication with a few clicks.
The business case for most teams is straightforward: the engineering time saved on DB ops quickly offsets the Atlas pricing premium over raw cloud compute. In my case, we were spending roughly 4 hours per week on MongoDB maintenance tasks. That time went to zero post-migration.
[SOURCE: https://www.mongodb.com/docs/atlas/live-migration/]
Prerequisites
Before you start, make sure you have:
- Source: A MongoDB replica set (Live Migration does NOT work with standalone instances — you must convert to a replica set first)
- MongoDB version 4.4 or later on the source cluster
- Atlas account with an M10 or larger target cluster (Live Migration is not available on M0/M2/M5 free/shared tiers)
- Network access: Atlas must be able to reach your source cluster on port 27017 (or your custom port)
- A maintenance window in mind for the final cutover (not downtime — just a moment when you control app restarts)
mongodump/mongorestoreas a fallback (you won’t need them, but have them ready)
Important: If your source is a standalone MongoDB instance, you must convert it to a single-node replica set before Live Migration will work. Run
rs.initiate()on the standalone and allow a few minutes for the oplog to populate.
Step-by-Step: Migrating MongoDB Self-Hosted to Atlas
Step 1: Provision Your Atlas Target Cluster
Log into Atlas and create a new cluster. Choose your cloud provider and region carefully — pick the same region as your application servers to minimize latency.
# If you prefer the Atlas CLI (v1.x+)
atlas clusters create my-prod-cluster \
  --provider AWS \
  --region US_EAST_1 \
  --tier M30 \
  --mdbVersion 7.0
Set your Atlas cluster tier to match or exceed your current workload. I made the mistake of choosing M20 for a cluster averaging 8,000 operations/second — it was fine during migration but hit CPU limits under peak load the first week. Bump up at least one tier from what you think you need; you can scale down later.
Step 2: Configure Network Access and IP Allowlist
Atlas needs to reach your source cluster. Go to Network Access → IP Access List in the Atlas UI and add the IPs of your Atlas Live Migration service.
For Atlas-hosted Live Migration, MongoDB provides a set of IP ranges that initiate the connection:
# Check current Atlas Live Migration IPs for your region in the Atlas docs
# For AWS us-east-1 as of mid-2025, the CIDR blocks are in:
# https://www.mongodb.com/docs/atlas/reference/network-access/

# On your source server, also open the firewall:
sudo ufw allow from <atlas-migration-ip-range> to any port 27017
If your source cluster is behind a corporate firewall or private VPC, you’ll need to set up VPC Peering between your cloud VPC and Atlas before proceeding. This adds 2–3 hours of setup but is necessary for security-sensitive environments.
Step 3: Create a Migration User on the Source
Live Migration needs a MongoDB user on the source with the right privileges. Don’t use your application user for this.
// Run in mongosh on the source PRIMARY
use admin
db.createUser({
  user: "atlasMigration",
  pwd: "YOUR_STRONG_PASSWORD_HERE",
  roles: [
    { role: "readAnyDatabase", db: "admin" },
    { role: "clusterMonitor", db: "admin" },
  ]
})
The clusterMonitor role is required so Atlas can read oplog entries. Without it, the migration will fail with not authorized on admin to execute command { replSetGetStatus: 1 } — an error I hit on my first attempt because I only granted readAnyDatabase.
Step 4: Start Live Migration in the Atlas UI
- In Atlas, navigate to your target cluster → “…” menu → Migrate Data to this Cluster.
- Select “I’m migrating from MongoDB (not Atlas)”.
- Enter your source replica set connection string, the migration user credentials, and your SSL/TLS settings.
- Atlas will validate connectivity. If it fails, check firewall rules first — this accounts for 90% of validation failures.
- Click “Start Migration”.
Atlas will now begin the initial sync — copying all documents from source to target. For a 200GB database, expect 4–8 hours for initial sync depending on network throughput and document complexity.
# Monitor initial sync progress via the Atlas UI, or poll via Atlas API:
curl --user "publicKey:privateKey" --digest \
  "https://cloud.mongodb.com/api/atlas/v2/groups/{groupId}/liveMigrations/{migrationId}" \
  -H "Accept: application/vnd.atlas.2023-01-01+json"
Step 5: Monitor Oplog Lag and Wait for Steady State
After initial sync, Atlas enters oplog tailing mode — it reads every write from your source cluster’s oplog and applies it to Atlas in real time. The key metric to watch is oplog lag (shown in the Atlas UI).
You want oplog lag under 10 seconds before attempting cutover. If lag stays high, your source write rate is exceeding Atlas’s replication speed — consider scaling up the Atlas cluster tier.
Pro Tip: The oplog window on your source cluster determines how long you can pause before the migration falls out of sync. Check it with
rs.printReplicationInfo()on the source. For a busy cluster, you want at least 24 hours of oplog window. If it’s under 12 hours, increase theoplogSizeMBsetting before starting migration.
Step 6: Prepare Your Application for Cutover
Before cutting over, update your application’s MongoDB connection string in your configuration — but don’t deploy yet. Have it staged and ready.
# Old connection string (self-hosted replica set)
MONGO_URI="mongodb://appuser:pass@db1.internal:27017,db2.internal:27017,db3.internal:27017/mydb?replicaSet=rs0"

# New Atlas connection string (get exact string from Atlas UI → Connect)
MONGO_URI="mongodb+srv://appuser:pass@my-prod-cluster.abc123.mongodb.net/mydb?retryWrites=true&w=majority"
Note the mongodb+srv:// scheme — Atlas uses DNS SRV records for connection string simplicity. Make sure your application’s MongoDB driver version supports SRV (Node.js driver 3.x+, Python pymongo 3.3+, Java driver 3.8+).
Step 7: Execute the Cutover
When oplog lag is consistently under 5 seconds, you’re ready. The cutover sequence:
- Click “Prepare to Cut Over” in Atlas — this tells the service to do a final sync pass.
- Put your application into maintenance mode or gracefully stop writes (if possible).
- Wait for the Atlas UI to show “Ready to Cut Over” — this means all writes have been applied.
- Deploy your application with the new Atlas connection string.
- Verify application health (run your smoke tests).
- Click “Cut Over” in Atlas to finalize — this stops the migration service.
In my experience, steps 2–5 take under 60 seconds for a Node.js app with a rolling restart. The database itself is never “down” — only your app restarts.
[SOURCE: https://www.mongodb.com/docs/atlas/live-migration-from-com-to-atlas/]
Real-World Tips I Use in Production
Rebuild indexes on Atlas after cutover. Live Migration copies index definitions, but I always run db.collection.reIndex() on the Atlas cluster post-cutover to ensure indexes are clean. On one migration, I found a partially built index that caused query degradation for 20 minutes before I caught it.
Test your Atlas cluster under load before cutover. Use mongoreplay or a load testing tool to replay production-like traffic against Atlas for 30 minutes. This surfaces sizing issues before they affect users.
Enable Atlas backup before starting migration. The moment your Atlas cluster has live data, you want backups running. Enable Continuous Cloud Backup in Atlas settings — it uses oplogs to provide point-in-time recovery.
Security Note: Rotate your migration user’s password and revoke its access on the source cluster immediately after cutover. That user has broad read access across all databases and should not persist beyond the migration window.
Common Errors and How I Fixed Them
Error: “Initial sync failed: oplog is too old” This means your initial sync took longer than the oplog window. Fix: increase oplogSizeMB on the source before restarting migration, or reduce your write load temporarily during the initial sync window.
# On source PRIMARY in mongosh:
use admin
db.adminCommand({ replSetResizeOplog: 1, size: 51200 }) # 50GB oplog
Error: “SSL handshake failed” during validation Atlas requires TLS 1.2+. If your self-hosted MongoDB was started with --tlsDisabled or an old TLS config, you’ll hit this. Enable TLS on the source or use the “skip SSL” option in the Atlas migration UI (only acceptable for non-production data).
Error: Application gets MongoServerSelectionError after cutover This is almost always a network issue — your app servers can’t reach Atlas. Check that the Atlas IP allowlist includes your app servers’ egress IPs, and that your Atlas cluster’s network access isn’t restricted to VPC peering only.
How Long Does Migrating MongoDB Self-Hosted to Atlas Take Without Downtime?
The migration process itself takes hours (initial sync) to days depending on database size and write volume, but your application experiences zero downtime throughout. The only interruption is the 30–60 seconds it takes to restart your app with the new Atlas connection string.
FAQ
Q: Can I migrate a standalone MongoDB instance to Atlas without converting it to a replica set? A: No — Atlas Live Migration requires a replica set because it relies on the oplog for continuous replication. Convert your standalone to a single-node replica set with rs.initiate() first. This is a non-disruptive operation that takes under a minute.
Q: What is the minimum Atlas cluster tier required for Live Migration from a self-hosted MongoDB? A: You need at least an M10 dedicated cluster. Free and shared tiers (M0, M2, M5) do not support Live Migration. For production workloads, I’d recommend starting at M30 and scaling based on your performance advisor recommendations post-migration.
Q: How do I reduce oplog lag during MongoDB to Atlas migration? A: First, scale up your Atlas cluster tier — the target cluster processes incoming writes, so more resources means faster replication. Second, check for any write-heavy background jobs on the source that could be temporarily paused. Third, ensure network throughput between source and Atlas is not the bottleneck (target 500+ Mbps for large clusters).
Q: Is migrating from MongoDB self-hosted to Atlas safe for production databases? A: Yes, when done correctly. Live Migration is a read-only process on the source — it never writes to or modifies your existing cluster. Your source cluster continues serving your application normally throughout the entire migration. The risk window is only the cutover moment, which is just an application restart.
Conclusion
Migrating MongoDB self-hosted to Atlas without downtime is entirely achievable for most teams. The Live Migration tooling is mature, the process is well-documented, and the actual cutover window is measured in seconds, not hours. The three things that trip people up — oplog window size, index state post-migration, and network access configuration — are all addressable with a bit of pre-planning.
If you’re still self-hosting MongoDB because a migration feels too risky, I hope this walkthrough shows you it’s less scary than it looks. The operational overhead you’ll eliminate is absolutely worth it.
Have questions about your specific setup, or did you run into an edge case I didn’t cover? Leave a comment below — I read and reply to all of them.