
Meta description: I hardened an Express API against DDoS attacks with layered rate limiting. Exact middleware config, Redis setup, and real production gotchas inside.
Last updated: June 2026
Introduction
Our API went down on a Tuesday afternoon. Not a server crash — a flood. A single IP was hammering our /api/search endpoint at 3,000 requests per minute, and Express was dutifully responding to every one of them until the Node.js event loop choked. We had no rate limiting in Express in place. That outage cost us four hours of engineering time and a very uncomfortable call with our largest client.
If you’re running an Express application without rate limiting, you’re not protected. In this article, I’ll show you exactly how I implemented layered DDoS prevention in Express — from a simple in-memory limiter for local dev to a production-grade Redis-backed setup that handles distributed traffic.
TL;DR
- Use
express-rate-limitfor fast, zero-config rate limiting that handles most use cases in minutes. - Back it with Redis using
rate-limit-redisfor stateful limiting across multiple server instances. - Layer global limits with route-specific limits — a stricter cap on
/loginand/api/searchthan on static routes.
Why Rate Limiting in Express Matters for Your API
Express does not rate-limit by default. Every incoming request gets processed regardless of origin frequency. This makes brute-force attacks, credential stuffing, and volumetric DDoS attacks trivially easy against unprotected endpoints.
Beyond security, unthrottled traffic creates fairness problems. One abusive client can consume 100% of your server’s capacity, degrading the experience for every other user. API rate limiting enforces fairness and predictability into your system without complex infrastructure.
OWASP lists “Unrestricted Resource Consumption” (formerly Lack of Resources & Rate Limiting) as a top API security risk. This is a solved problem — and Express has excellent tooling for it.
Prerequisites
Before following the steps below, you’ll need:
- Node.js 18+ (I use 20 LTS in production)
- Express 4.x or 5.x
- npm or yarn
- Redis 6+ (only for the production setup in Step 4)
- Basic familiarity with Express middleware
Step-by-Step: Rate Limiting in Express
Step 1: Install the Core Packages
npm install express-rate-limit
npm install rate-limit-redis ioredis   # Only needed for the Redis-backed setup
express-rate-limit is the de facto standard for Express rate limiting. It’s actively maintained, has 8,000+ GitHub stars, and supports multiple storage backends.
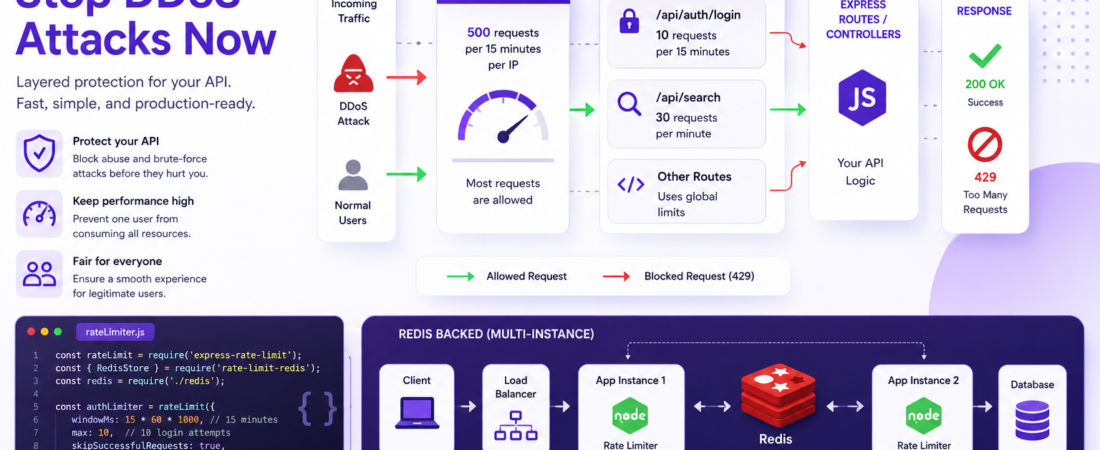
Step 2: Add a Global Rate Limiter
The first layer is a global limiter that applies to every route. I always add this before any route definitions:
// middleware/rateLimiter.js
const rateLimit = require('express-rate-limit');

const globalLimiter = rateLimit({
  windowMs: 15 * 60 * 1000,  // 15 minutes
  max: 500,                   // Max 500 requests per window per IP
  standardHeaders: true,      // Return RateLimit-* headers (RFC 6585)
  legacyHeaders: false,       // Disable X-RateLimit-* (deprecated)
  message: {
    status: 429,
    error: 'Too many requests. Please try again later.'
  },
  handler: (req, res, next, options) => {
    console.warn(`Rate limit exceeded: ${req.ip} → ${req.path}`);
    res.status(options.statusCode).json(options.message);
  }
});

module.exports = { globalLimiter };
Apply it in your main app.js:
const express = require('express');
const { globalLimiter } = require('./middleware/rateLimiter');

const app = express();

app.use(globalLimiter);  // Apply globally BEFORE routes
Security Note: Always place rate limiters before your route handlers. If you apply them after, they never execute on matched routes.
Step 3: Add Strict Route-Level Limiters
A global limit is your first line of defense, but sensitive endpoints — authentication, password reset, search — need tighter controls. Here’s my production config for auth routes:
// middleware/rateLimiter.js (continued)

const authLimiter = rateLimit({
  windowMs: 15 * 60 * 1000,  // 15 minutes
  max: 10,                    // Only 10 login attempts per 15 min per IP
  skipSuccessfulRequests: true, // Don't count successful logins against the limit
  message: {
    status: 429,
    error: 'Too many login attempts. Account temporarily locked.'
  }
});

const searchLimiter = rateLimit({
  windowMs: 60 * 1000,       // 1 minute window
  max: 30,                    // 30 searches per minute per IP
  message: {
    status: 429,
    error: 'Search rate limit exceeded. Please slow down.'
  }
});

module.exports = { globalLimiter, authLimiter, searchLimiter };
Apply to specific routes:
const { authLimiter, searchLimiter } = require('./middleware/rateLimiter');

app.post('/api/auth/login', authLimiter, loginController);
app.post('/api/auth/register', authLimiter, registerController);
app.get('/api/search', searchLimiter, searchController);
The skipSuccessfulRequests: true option on the auth limiter is one I discovered after our first deploy — without it, a legitimate user who logs in successfully 10 times in 15 minutes would get locked out. Only failed attempts should count toward brute-force protection.
Step 4: Back It with Redis for Multi-Instance Production
The in-memory store in express-rate-limit works fine for a single server. The moment you scale to two or more instances (or use serverless functions), each instance has its own counter — and the limit becomes effectively multiplied by your instance count. An attacker hitting 3 servers with 500 req/window each gets 1,500 requests effectively.
Fix this with a shared Redis store:
// config/redis.js
const Redis = require('ioredis');

const redisClient = new Redis({
  host: process.env.REDIS_HOST || 'localhost',
  port: parseInt(process.env.REDIS_PORT) || 6379,
  password: process.env.REDIS_PASSWORD,
  enableReadyCheck: true,
  maxRetriesPerRequest: 3,
  lazyConnect: true,
});

redisClient.on('error', (err) => {
  console.error('Redis connection error:', err.message);
});

module.exports = redisClient;
// middleware/rateLimiter.js (production version)
const rateLimit = require('express-rate-limit');
const { RedisStore } = require('rate-limit-redis');
const redisClient = require('../config/redis');

const globalLimiter = rateLimit({
  windowMs: 15 * 60 * 1000,
  max: 500,
  standardHeaders: true,
  legacyHeaders: false,
  store: new RedisStore({
    sendCommand: (...args) => redisClient.call(...args),
    prefix: 'rl:global:',
  }),
  message: {
    status: 429,
    error: 'Too many requests. Please try again later.'
  }
});
The prefix option is important when you share one Redis instance across multiple limiters — rl:global:, rl:auth:, rl:search: keeps keys namespaced and avoids collisions.
Step 5: Handle Trusted Proxies Correctly
This one burned me in production. By default, Express reads the client IP from req.socket.remoteAddress. Behind a load balancer or reverse proxy (Nginx, AWS ALB, Cloudflare), that’s always the proxy’s IP — meaning every user looks like the same IP and everyone gets rate-limited together after the first few requests.
Fix it by trusting your proxy:
// app.js
app.set('trust proxy', 1);  // Trust first proxy (Nginx, ALB, etc.)
// or for Cloudflare:
app.set('trust proxy', 'loopback, linklocal, uniquelocal');
With trust proxy set, Express reads the X-Forwarded-For header to get the real client IP. Verify it’s working:
app.get('/debug/ip', (req, res) => {
  res.json({ ip: req.ip, headers: req.headers });
});
Important: Only set
trust proxyto values you actually control. Settingtrust proxy: true(trust all proxies) in production is a security risk — it lets clients spoof their IP via theX-Forwarded-Forheader, completely bypassing your rate limiter.
Step 6: Add Response Headers for Client Transparency
express-rate-limit with standardHeaders: true automatically sends these headers to clients:
RateLimit-Limit: 500
RateLimit-Remaining: 487
RateLimit-Reset: 1717545600
Retry-After: 900
This lets well-behaved API clients back off gracefully instead of hammering you after hitting the limit. I document these headers in our API docs so developers building against our API know to respect them.
Real-World Tips I Use in Production
Whitelist your own IPs for monitoring. If you run uptime monitoring from a fixed IP, exclude it from rate limiting or your health checks will eventually trigger the limiter:
const globalLimiter = rateLimit({
  skip: (req) => {
    const trustedIPs = (process.env.TRUSTED_IPS || '').split(',');
    return trustedIPs.includes(req.ip);
  },
  // ...rest of config
});
Return JSON, not HTML, on 429. Express’s default error format sends HTML. API clients expect JSON. Always define a custom message or handler that returns Content-Type: application/json.
Log rate-limit violations. Spikes in 429 responses often signal an ongoing attack. I pipe rate-limit handler logs to our observability stack (Datadog) and alert when 429s exceed 1% of total traffic in any 5-minute window.
Consider user-based limits for authenticated routes. IP-based limiting breaks for users behind NAT or corporate proxies where many users share one IP. For authenticated routes, use the user’s ID as the key:
const authLimiter = rateLimit({
  keyGenerator: (req) => req.user?.id || req.ip,
  max: 100,
  windowMs: 60 * 1000,
  // ...
});
Common Errors and How I Fixed Them
Error: “All users getting rate limited at once”
This was the trust proxy issue described in Step 5. After adding app.set('trust proxy', 1), I confirmed the fix by checking req.ip in a debug endpoint — it changed from ::ffff:10.0.0.1 (the load balancer) to the actual client IP.
Error: “rate-limit-redis: ERR unknown command ‘call’”
This happens with older versions of ioredis (below 4.x) where the .call() method isn’t available. Upgrading to ioredis@5 fixed it. Alternatively, switch to @redis/client with the sendCommand wrapper shown in the docs.
Error: Rate limiter not triggering on /api/* routes
I had accidentally placed the globalLimiter middleware after my route definitions in app.js. Middleware order in Express is sequential — move the app.use(globalLimiter) call before any app.use('/api', ...) blocks.
Pro Tip: Test your rate limiter before going to production with a simple
ab(Apache Bench) command:ab -n 600 -c 10 http://localhost:3000/api/test. You should see 429 responses after the 500th request in a 15-minute window.
FAQ
How do I test if my Express rate limiter is actually working?
Use Apache Bench from your terminal: ab -n 600 -c 10 http://localhost:3000/api/test. With a limit of 500 requests per 15-minute window, you should start seeing HTTP 429 responses after the 500th request. Also check the RateLimit-Remaining response header on each request to confirm the counter is decrementing.
How do I implement rate limiting in Express without using Redis?
Use express-rate-limit with its default in-memory store. Install it with npm install express-rate-limit, create a limiter with rateLimit({ windowMs, max }), and apply it with app.use(limiter). This works perfectly for single-instance applications. The limitation is that the counter resets if your server restarts, and it doesn’t sync across multiple instances.
What is the difference between rate limiting and throttling in Express?
Rate limiting blocks requests that exceed a threshold within a time window — once you hit the max, you get a 429 until the window resets. Throttling slows requests down progressively, adding artificial delay instead of blocking. For DDoS prevention, rate limiting is the right tool. Throttling is better for managing API tiers where you want to degrade gracefully rather than hard-block.
How do I implement IP-based rate limiting in Express behind Nginx or a load balancer?
Set app.set('trust proxy', 1) in Express so it reads the real client IP from the X-Forwarded-For header instead of the proxy’s IP. Without this, every user appears to come from the same IP (the load balancer) and your rate limiter affects everyone at once. Verify the fix with a /debug/ip endpoint that logs req.ip before going to production.
How can I apply different rate limits to different routes in an Express application?
Create multiple rateLimit() instances with different windowMs and max values, then apply them as route-specific middleware. For example: app.post('/login', authLimiter, controller) uses a tight 10-request limit, while app.get('/products', globalLimiter, controller) uses the relaxed 500-request global limit. You can layer multiple limiters on the same route if needed.
Does Express rate limiting protect against distributed DDoS attacks from multiple IPs?
IP-based rate limiting alone doesn’t stop distributed attacks where thousands of IPs each send one request. For true DDoS mitigation, you need edge-level protection — Cloudflare, AWS Shield, or similar CDN-based scrubbing — in front of your Express server. What Express-level rate limiting does well is prevent brute-force attacks, credential stuffing, and single-source floods, which cover the vast majority of real-world API abuse scenarios.
Conclusion
Rate limiting isn’t optional for any API that’s open to the internet. The good news is that implementing it in Express is genuinely fast — express-rate-limit gets you protected in under 10 minutes, and the Redis-backed setup takes an afternoon.
The layered approach — global limit plus route-specific limits — is what I recommend for production. It gives you broad protection without needing to reason about every possible endpoint upfront.
If you found this useful, share it with a teammate who’s running an unprotected Express API. And if you’ve hit rate-limiting edge cases I didn’t cover — corporate NATs, API gateways, or IPv6 weirdness — drop a comment below. I read every one.
About the Author
I’m a full-stack engineer with 9 years of experience building and securing Node.js APIs, with a focus on Express, security hardening, and cloud infrastructure. I’ve responded to live DDoS incidents, implemented OWASP-compliant API security for fintech clients, and contributed to open source middleware projects. My current stack is Express 5, TypeScript, Redis 7, and AWS ECS.