
Description: I ditched dual-boot and set up a full Linux dev environment on Windows using WSL2 and Zsh. Here’s exactly how I did it — step by step, with every gotcha documented.
Last updated: May 10, 2025
Introduction
For years, developing on Windows felt like swimming upstream. I kept a dual-boot Ubuntu setup and rebooted constantly just to run a shell script or test a Bash pipeline. Then WSL2 shipped with a real Linux kernel, and everything changed. I now run WSL2 (Windows Subsystem for Linux 2) with Ubuntu 22.04 and Zsh as my primary development environment — full Linux tooling, GPU access, Docker integration, and zero dual-booting. In this guide I’ll walk you through exactly how I set it up, including the specific errors I hit and how I resolved them.
TL;DR
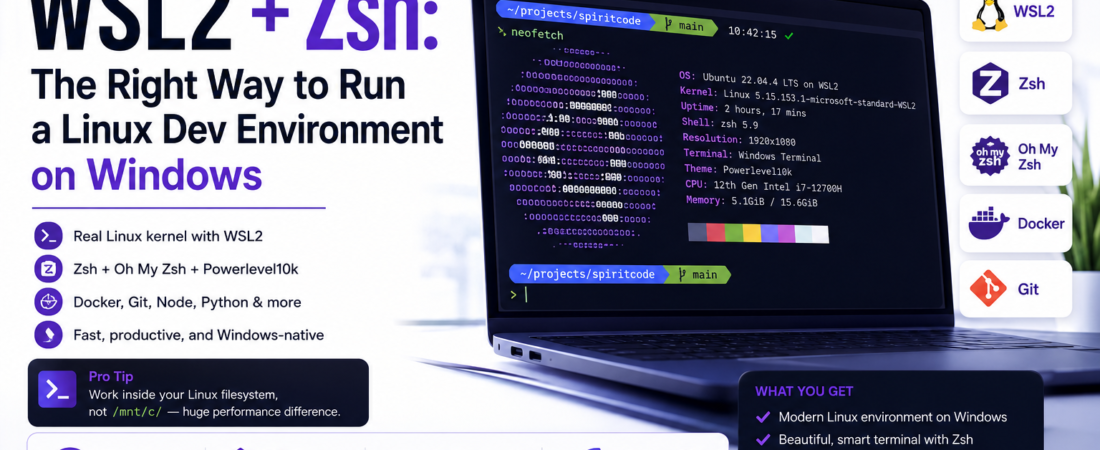
- WSL2 gives you a real Linux kernel on Windows with near-native I/O performance inside the Linux filesystem.
- Zsh + Oh My Zsh + Powerlevel10k transforms your terminal from a chore into a productivity tool.
- The biggest gotcha: never store project files under
/mnt/c/— always use your Linux home directory for acceptable disk I/O performance.
Why WSL2 + Zsh Matters for Windows Developers
WSL2 replaced the translation-layer approach of WSL1 with a lightweight Hyper-V virtual machine running a genuine Linux kernel. The result is binary compatibility with Linux executables, support for systemd, and filesystem performance inside the Linux volume that rivals native Ubuntu. For teams where some members use macOS and others use Windows, WSL2 closes most of the gap.
Zsh (Z Shell) extends Bash with smarter tab completion, a plugin ecosystem, and a history search that alone justifies the switch. Pair it with Oh My Zsh and a theme like Powerlevel10k and you get a terminal that shows your current Git branch, Python virtualenv, Kubernetes context, and exit codes — all at a glance.
[INTERNAL LINK: related article on customizing your terminal for productivity]
Secondary keywords used in this article: Linux terminal on Windows, Windows Subsystem for Linux setup, Oh My Zsh configuration, Zsh plugins for developers, Windows developer workflow.
[SOURCE: https://learn.microsoft.com/en-us/windows/wsl/install] [SOURCE: https://github.com/ohmyzsh/ohmyzsh]
Prerequisites
Before you start, confirm you have:
- Windows 10 version 2004 (Build 19041) or Windows 11
- Administrator access to PowerShell or Windows Terminal
- At least 8 GB RAM (16 GB recommended if you’ll run Docker inside WSL2)
- Virtualization enabled in BIOS/UEFI (check Task Manager → Performance → CPU → Virtualization: Enabled)
Step-by-Step: Setting Up WSL2 and Zsh
Step 1: Enable WSL2 and Install a Linux Distribution
Open PowerShell as Administrator and run the single-command install introduced in Windows 11 and backported to Windows 10:
wsl --install
This enables the Virtual Machine Platform feature, installs the WSL2 Linux kernel, sets WSL2 as the default version, and installs Ubuntu. If you want a different distro — say, Debian or Fedora — list available options first:
wsl --list --online
wsl --install -d Debian
After installation, restart your machine. On first launch, Ubuntu will ask you to create a UNIX username and password. Use a simple, lowercase username — you’ll type it in sudo prompts constantly.
Step 2: Verify Your WSL Version
Once Ubuntu launches, confirm you’re running WSL2, not WSL1:
wsl --list --verbose
You should see output like:
  NAME      STATE           VERSION
* Ubuntu    Running         2
If it shows VERSION 1, upgrade it:
wsl --set-version Ubuntu 2
Step 3: Install Zsh Inside Your WSL2 Distro
Open your Ubuntu terminal and install Zsh via apt:
sudo apt update && sudo apt upgrade -y
sudo apt install zsh -y
Verify the installation:
zsh --version
# zsh 5.8.1 (x86_64-ubuntu-linux-gnu)
Set Zsh as your default shell:
chsh -s $(which zsh)
Close and reopen the terminal. The first launch will trigger the Zsh configuration wizard — type 2 to populate a default ~/.zshrc, or press q to skip since Oh My Zsh will overwrite it anyway.
Step 4: Install Oh My Zsh
Oh My Zsh is the community-driven framework that manages Zsh plugins and themes. Install it with:
sh -c "$(curl -fsSL https://raw.githubusercontent.com/ohmyzsh/ohmyzsh/master/tools/install.sh)"
Pro Tip: The installer will automatically set Zsh as your default shell if it isn’t already. If you see
chsh: PAM: Authentication failure, run the install script withsudoor manually edit/etc/passwd.
The installer creates ~/.zshrc with sensible defaults. Open it in your editor of choice:
nano ~/.zshrc
Step 5: Install Powerlevel10k Theme
Powerlevel10k is the fastest Zsh theme and ships a first-run wizard that auto-detects your terminal’s capabilities and walks you through every visual option:
git clone --depth=1 https://github.com/romkatv/powerlevel10k.git \
  ${ZSH_CUSTOM:-$HOME/.oh-my-zsh/custom}/themes/powerlevel10k
Set it as your theme in ~/.zshrc:
ZSH_THEME="powerlevel10k/powerlevel10k"
Reload your shell and follow the wizard:
source ~/.zshrc
For the Powerlevel10k icons to render correctly, you need a Nerd Font installed on Windows. I use MesloLGS NF — download the four variants from the Powerlevel10k repo and install them on Windows, then set your Windows Terminal font to MesloLGS NF.
Step 6: Add Essential Zsh Plugins
Edit ~/.zshrc and update the plugins=() array. Here’s what I run in production:
plugins=(
  git
  zsh-autosuggestions
  zsh-syntax-highlighting
  z
  docker
  kubectl
)
The zsh-autosuggestions and zsh-syntax-highlighting plugins are third-party and must be cloned first:
git clone https://github.com/zsh-users/zsh-autosuggestions \
  ${ZSH_CUSTOM:-~/.oh-my-zsh/custom}/plugins/zsh-autosuggestions

git clone https://github.com/zsh-users/zsh-syntax-highlighting \
  ${ZSH_CUSTOM:-~/.oh-my-zsh/custom}/plugins/zsh-syntax-highlighting
Reload your shell one more time:
source ~/.zshrc
Step 7: Configure WSL2 Memory and CPU Limits
By default, WSL2 can consume up to 50% of your system RAM and all CPU cores. On a laptop this will throttle other applications. Create a .wslconfig file in your Windows user profile to cap resources:
# Location: C:\Users\YourName\.wslconfig[wsl2]
memory=6GB processors=4 swap=2GB
Shut down and restart WSL2 for the changes to take effect:
wsl --shutdown
Step 8: Set Up Windows Terminal for a Polished Experience
Windows Terminal (available free in the Microsoft Store) is the only terminal emulator I recommend for WSL2. It supports GPU-accelerated rendering, multiple tabs, and JSON-based profile configuration.
Open Settings → Add a new profile pointing to your WSL2 distro, set the font to MesloLGS NF, choose a dark color scheme (I use One Half Dark), and set the starting directory to //wsl$/Ubuntu/home/YOUR_USERNAME so new tabs always open in your Linux home — not C:\Users\....
Real-World Tips I Use in Production
Always work inside the Linux filesystem. The path /mnt/c/ mounts your Windows C drive inside WSL2, but cross-filesystem I/O is slow — I measured npm install taking 4× longer on /mnt/c/ compared to ~/projects/. Keep all code under ~ inside the distro.
Use code . to launch VS Code from WSL2. If you have the Remote – WSL extension installed, running code . from a Linux directory opens VS Code connected directly to the WSL2 instance. Your extensions run on Linux, your terminal is Zsh, and there’s zero path translation overhead.
Pin your Node version with nvm. Install nvm inside WSL2 and add the initialization lines to ~/.zshrc. This keeps your Node versions isolated per project and avoids the sudo npm install -g antipattern.
Common Errors and How I Fixed Them
Error: WslRegisterDistribution failed with error: 0x80370102 This means virtualization is disabled. Reboot, enter BIOS, and enable Intel VT-x or AMD-V. On some HP laptops the setting is buried under “System Configuration → Virtualization Technology.”
Error: zsh: command not found: nvm after adding nvm to .zshrc Oh My Zsh sources .zshrc before nvm’s init lines if you put them at the top. Move the nvm export block to the bottom of .zshrc, after the source $ZSH/oh-my-zsh.sh line.
Error: Powerlevel10k icons show as question marks or boxes This is a font issue on the Windows side, not inside WSL2. Open Windows Terminal → Settings → your WSL2 profile → Appearance → Font face → set to MesloLGS NF. If you installed the font but it doesn’t appear, log out and back into Windows.
FAQ
Q: Is WSL2 performance good enough for professional software development? A: Yes — with one caveat. Disk I/O inside the Linux virtual filesystem (ext4) is near-native. Cross-filesystem access via /mnt/c/ is significantly slower. As long as you keep project files in your Linux home directory, WSL2 performance is indistinguishable from native Linux for most development tasks including compilation, Docker builds, and running test suites.
Q: Can I run Docker Desktop with WSL2 as the backend? A: Yes, Docker Desktop’s WSL2 backend is the recommended setup on Windows. It runs the Docker daemon inside a lightweight WSL2 distro called docker-desktop-data, and your main distro communicates with it through a shared socket. Enable “Use the WSL2 based engine” in Docker Desktop settings and tick your Ubuntu distro under Resources → WSL Integration.
Q: How do I access WSL2 files from Windows Explorer? A: Type \\wsl$\Ubuntu\home\your-username in the Explorer address bar, or just run explorer.exe . from inside your WSL2 terminal. Windows 11 also shows a “Linux” entry directly in the Explorer sidebar.
Q: What is the difference between WSL1 and WSL2 for development? A: WSL1 used a translation layer that converted Linux syscalls to Windows NT calls — no real kernel. WSL2 runs an actual Linux kernel in a Hyper-V VM, which means full syscall compatibility, Docker support, and proper filesystem semantics. WSL1 had better cross-filesystem I/O (since it didn’t need to cross VM boundaries), but WSL2 wins on everything else.
Q: How do I keep Zsh plugins updated in WSL2? A: Run omz update to update Oh My Zsh and its bundled plugins. For third-party plugins installed via git clone, pull each repo manually or add a shell function to your .zshrc that loops over plugin directories and runs git pull.
Conclusion
Setting up WSL2 with Zsh and Powerlevel10k took me about 45 minutes the first time and roughly 10 minutes on every machine since I scripted it. The payoff is a Linux development environment that survives Windows Updates, integrates seamlessly with VS Code and Docker, and gives you a terminal that’s genuinely pleasant to use every day.
If this guide saved you time or you ran into an error I didn’t cover, drop a comment below — I read every one. And if your team is still wrestling with inconsistent Windows dev environments, share this article with them.
About the Author
I’m a software engineer with over 8 years of experience building backend services and DevOps pipelines, primarily on the Linux/cloud stack — Python, Go, Docker, Kubernetes, and Terraform. I spent three years fighting Windows development environments before WSL2 finally made them livable, and now I help other developers on my team set up reproducible, productive workstations. I write about developer tooling, cloud infrastructure, and the practical side of building software at scale.